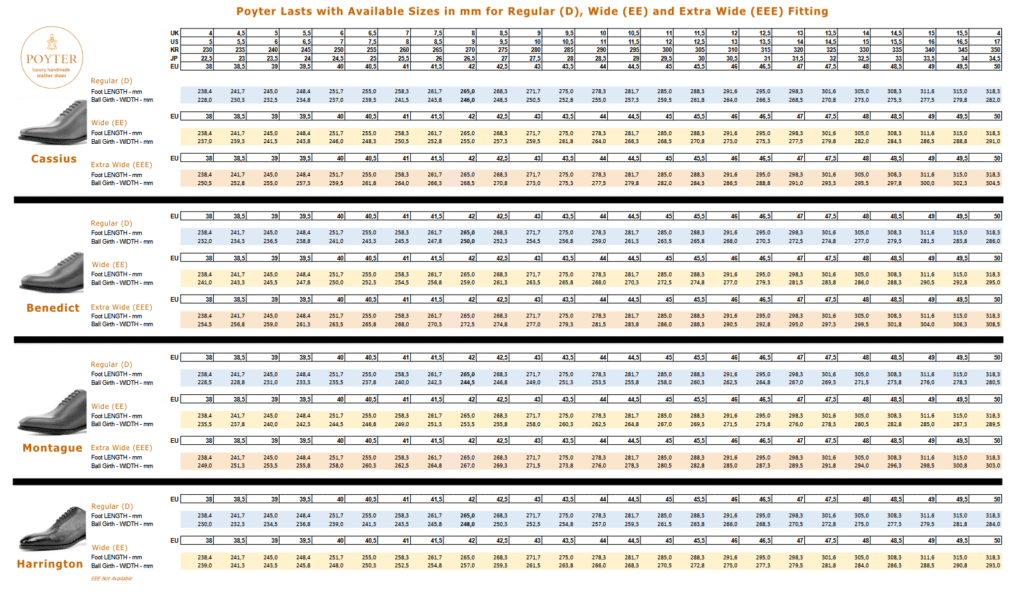
Wide Fit? We've Got You Covered.
You don’t always need a made-to-measure order. When using our 3D Shoe Design Tool, you can select Wide (EE) or Extra Wide (EEE) fittings — ideal for broader feet. Simply measure your foot length and ball girth, then match them with our size chart below. If they align, you’re ready to design your perfect pair in any style, leather, or sole combination — with confidence in the fit.
>> We also offer half sizes to ensure a more precise fit.

Don’t see your fit? We also offer custom-fit, made-to-measure shoes. See below for full instructions.
How to Measure Your Foot Size for
Made to Measure Shoes?
If our EE or EEE wide fit isn’t suitable — whether due to unique foot shape or medical conditions — we’ll craft a made-to-measure shoe with a custom last. Simply provide measurements for both feet as outlined below.
Full Refund: To further give confidence to our customers, we offer a no-questions full-refund if shoes don’t fit.
Minimum Measurement Requirements for a Made to Measure Shoe:
To craft a pair of made-to-measure shoes, our artisans require at least three key measurements along with the corresponding photographs to get started.
- Foot length (A-B, see the image below)
- Ball Girth (X, see the image below)
- Instep Girth (Y, see the image below)
IMPORTANT NOTE:
Additionally, we ask for photos of your foot with the measuring tape in place for both the ball girth and instep girth measurements.
Please also include details of the brand and the off-the-shelf shoe size you typically wear.

Custom Last Foot Measurements (If Required)
Note: Please send us the initial measurements first. If a custom last is needed, we’ll request the additional measurements outlined below.
Creating a custom shoe last is the most intricate part of crafting bespoke shoes. It requires years of skill and experience to measure feet in person and handcraft a shoe last. Since the COVID outbreak, Poyter has developed this easy-to-follow guide for measuring your foot at home for custom shoes. We convert these measurements into 3D models using our in-house tools, ensuring precision and comfort. This innovative approach is highly valued by our customers, as it is safe, hassle-free, and reduces production costs – ultimately keeping the price affordable for you
Here is a detailed step-by-step process for measuring your foot at home to create a custom last:
STEP-1: Tracing your foot
Begin by tracing your foot while standing. It’s best to have someone assist you with this to ensure accuracy. Use a pencil or similar instrument, keeping it as vertical as possible to trace around the foot.
Once the outline is traced, make pencil marks at the following key points while your foot remains on the paper:
Point A: End of longest toe
Point B: Back of heel
Point C: Side of 1st ball Joint
Point D: Side of 5th ball Joint
Point E: Left side of the heel
Point F: Right side of the heel
Now, draw straight lines to measure the following dimensions in millimetres:
- Foot Length: Draw a line from Point A to Point B
- Ball Line: Draw a line from Point C to Point D
- Heel Width: Draw a line from Point E to Point F
Once you’ve drawn the lines, measure the lengths in millimetres and write them down clearly on the paper. These measurements will be essential for creating your custom last.

STEP 2: Measuring Foot Girth
To accurately measure your foot girth at different points, we need three key measurements. Please refer to the image below for guidance.
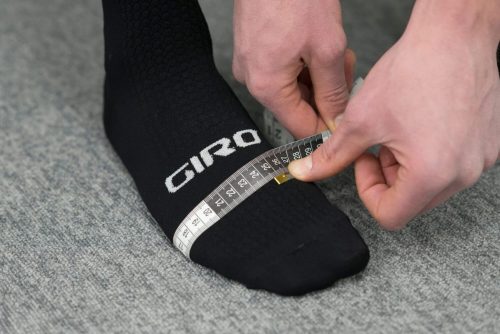
Point X, Ball Girth: The ball girth, also known as the joint girth, measures the circumference around the toe box at its widest point, typically around the metatarsal heads (the ball of the foot). To measure ball girth, run the tape measure in a loop around the sides of the first and fifth ball joints. The loop should follow the shortest path between these two points. (See the video below for a visual demonstration.)
Point Y, Instep Girth: The instep girth is measured around the middle of your arch. Wrap the tape measure around this area to get your measurement. Ensure the loop follows the shortest path around the instep. (Watch the video below for guidance.)
Point Z, Heel Girth: As shown in the image, measure the point marked as Z to estimate your heel girth.
IMPORTANT NOTES:
- For each of the foot girth measurements, please take a photo with the measuring tape still in place on your foot to help us understand the point of thickness, as shown in the image.
- Ensure you’re wearing your regular socks while measuring.
- It's common for one foot to be slightly larger than the other, so please measure both feet and send us the measurements for the larger foot.
These measurements will ensure a precise fit for your custom last.

STEP 3: Allowances
If you use custom insoles, orthotics, inserts, or thicker socks, please make sure to note this at the time of your order. This additional information is vital for us to account for any necessary allowances during the development of your custom last. It ensures that your shoes fit snugly while still allowing your feet the necessary space to move comfortably, which is essential for both function and comfort.
Additional Helpful Information:
- We recommend sending a few pictures of your bare feet from different angles. This will help us confirm that no further measurements are required.
- It’s also useful to know which brand or size typically fits you well. Including a few images of your current shoes can further assist us in ensuring the best possible fit.